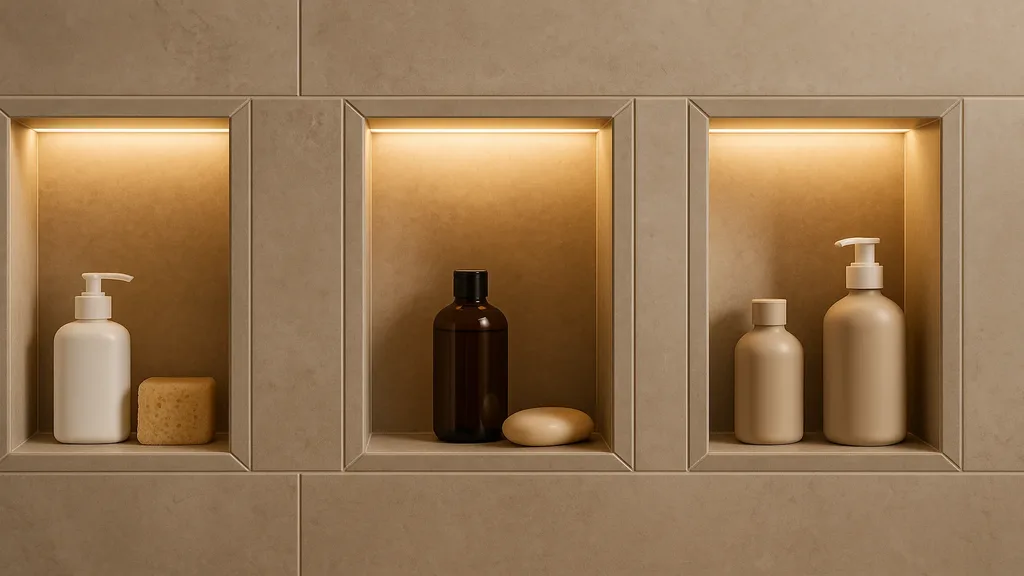
A shower niche is one of the smallest elements in a bathroom renovation, yet it is one of the most visible. Done well, it becomes a design feature that elevates the entire shower. Done poorly, it looks like a hole in the wall with tile around it.
Here is how we approach shower niches at JVR Complete.
Placement: Eye Level, Not Elbow Level
The most common niche mistake is placement. Many installers position the niche wherever it is convenient between studs, which often means it ends up too low — at hip or elbow height, requiring you to bend every time you reach for shampoo.
The ideal niche placement is between 48 and 60 inches from the shower floor, depending on the primary user’s height. This puts bottles at easy arm’s reach without bending. For showers used by multiple family members, I often install two niches at different heights or a taller vertical niche with an interior shelf divider.
Sizing for Real Products
Before cutting a niche opening, I ask clients to bring in the actual bottles and products they use daily. A niche that is too shallow for a large shampoo bottle is useless. A niche that is too narrow for a face wash tube beside a conditioner bottle is frustrating.
Standard niche interior dimensions that work well:
- Width: 12-14 inches (fits two standard bottles side by side)
- Height: 14-16 inches per shelf (accommodates tall pump bottles)
- Depth: 3.5 inches minimum (the depth of a standard stud bay — deeper is better if the wall framing allows it)
For homeowners who use many products, a double-height niche with a centre shelf or a horizontal niche spanning the full width of the shower wall provides generous storage without cluttering the shower floor.
Waterproofing: The Critical Detail You Cannot See
The niche is the most vulnerable point in a shower’s waterproofing system. Water does not just hit the niche face — it pools on the bottom shelf, runs down the interior walls, and can penetrate behind tile through grout joints.
At JVR Complete, every niche gets the same waterproofing treatment:
- Pre-formed waterproof niche body (Schluter Kerdi-Board or equivalent) — not just framed-in drywall with a paint-on membrane
- Continuous membrane integration — the niche membrane ties into the surrounding wall membrane with no gaps or unsealed seams
- Slight slope on the niche floor — a 5-degree pitch toward the shower ensures water drains out rather than pooling inside
- Full waterproofing coverage on all interior surfaces, including the ceiling of the niche and the underside of any shelves
This costs more than the bare-minimum approach. It also means the niche will never leak — not in one year, not in twenty.
The Waterfall Edge Detail
Instead of using metal Schluter trim or a bullnose tile at the outside corners of the niche, I mitre-cut the wall tile at 45 degrees so the tile pattern wraps seamlessly around the niche opening. This is called a waterfall edge or mitre return.
The result is a clean, furniture-quality corner that eliminates the metallic strip and makes the niche look integrated into the wall rather than added to it. It requires precision cutting and careful alignment, but the visual payoff is significant.
Accent Tile: Making the Niche a Feature
The niche interior is a natural canvas for accent tile. While the surrounding shower walls may be a large-format porcelain, the niche can feature:
- Marble or natural stone mosaic that adds warmth and texture
- A smaller-format version of the wall tile in a contrasting colour
- Metallic or glass mosaic tile that catches light and creates a jewel-like focal point
- Herringbone or chevron pattern in the same material as the walls but at a different scale
The accent tile should complement, not compete with, the primary wall tile. I generally recommend staying within the same colour family but varying the scale, pattern, or material.
LED Niche Lighting
For clients who want a spa-quality shower experience, I install LED strip lighting along the top interior edge of the niche. The light casts a warm downward glow across the niche contents, creating a subtle but beautiful illumination effect — especially in the evening.
The LED strip is recessed behind a small lip so the light source is hidden. It connects to the bathroom lighting circuit and is controlled by the same dimmer switch. All connections are made outside the wet area, and the strip itself is rated for wet locations.
This detail costs approximately $200-$400 in materials and labour but delivers a designer-level finish that clients consistently cite as one of their favourite features.
A Detail Worth Getting Right
A shower niche occupies perhaps two square feet of your bathroom. But it is at eye level, it is used daily, and it says everything about the attention to detail in the overall renovation.
If you are planning a bathroom renovation in the Niagara Region, contact JVR Complete to discuss how we approach every detail — from the shower niche to the heated floor to the perfect tile layout.