I will be honest with you: living through a kitchen renovation is uncomfortable. For 6 to 14 weeks, the room you use most — the place where you cook, eat, gather, and start your mornings — is a construction zone. There is dust. There is noise. There are days when you wonder why you signed up for this.
And then it is done, and you cannot imagine your home any other way.
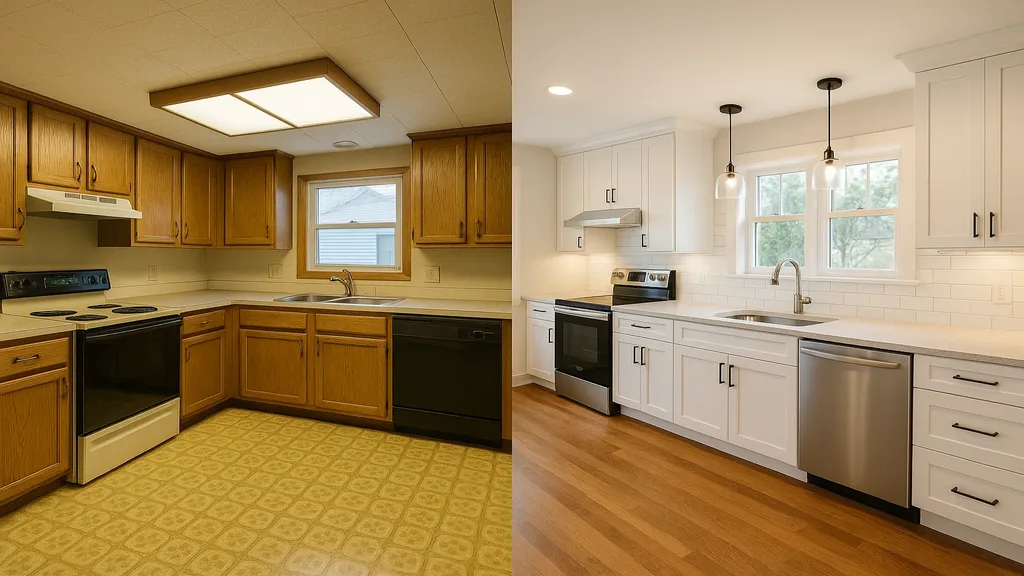
Here is my honest guide to surviving the process, based on hundreds of kitchen renovations across the Niagara Region.
Before Demolition: Set Up Your Temporary Kitchen
The single most important thing you can do is establish a functional temporary kitchen before the first cabinet comes off the wall. This is your lifeline for the duration of the project.
What you need:
- A folding table or countertop surface in a room with access to a power outlet
- Your microwave (the hero appliance of every kitchen renovation)
- A toaster oven (surprisingly versatile — you can cook almost anything in it)
- An electric kettle
- A small portable induction burner (for stovetop cooking without gas or a built-in range)
- Paper plates, disposable cutlery, and basic cooking utensils
- A cooler with ice packs or a mini-fridge if you do not have a second fridge elsewhere in the home
- Access to a bathroom or laundry sink for water and dish washing
Where to set up: A dining room, basement, or spare bedroom works well. I recommend setting up in a room that can be closed off from the construction zone to minimize dust contamination on your food prep surfaces.
Week by Week: What to Expect
Every kitchen renovation is different, but here is a general timeline for a standard-scope project:
Weeks 1-2: Demolition and Rough-In
This is the loudest and most disruptive phase. Old cabinets, countertops, flooring, and drywall are removed. Framing modifications happen. Plumbing and electrical are roughed in to new locations. The kitchen looks like a bomb went off — this is normal and expected.
Survival tip: Leave the house during demo days if possible. Visit family, work from a coffee shop, or take the kids to the park. The noise and dust are at their worst during this phase.
Weeks 3-4: Structural, Mechanical, and Inspections
If walls are being moved, beams installed, or plumbing/electrical relocated, this phase handles the infrastructure work. Building inspections occur at this stage — the inspector needs to see the rough-in before walls are closed.
Survival tip: This phase is quieter than demolition but involves multiple tradesperson visits. Keep pathways clear and secure pets during inspection days.
Weeks 5-7: Drywall, Primer, and Cabinet Installation
Drywall goes up, gets taped, mudded, and sanded (dusty again — temporarily). Once primed, cabinets are installed. This is when the renovation starts to look like a kitchen again, and your excitement begins to build.
Survival tip: Drywall sanding produces fine dust that travels everywhere. We use dust barriers and air scrubbers, but sealing off adjacent rooms with plastic sheeting helps significantly.
Weeks 8-10: Countertops, Tile, and Fixtures
Countertops are templated after cabinets are installed (they cannot be fabricated before this), then installed 2-3 weeks later. Backsplash tile goes in. Plumbing fixtures and electrical fixtures are connected.
Survival tip: The end is in sight. This phase involves less noise and dust, and you can start to see the final design taking shape.
Weeks 11-12: Paint, Hardware, and Final Details
Final paint, cabinet hardware installation, touch-ups, and the last details. Appliances are installed and connected. The final clean happens.
Survival tip: Resist the urge to start using the kitchen before the final coat of paint cures. Give it 48 hours.
Dust Management
Renovation dust is unavoidable, but it can be managed:
- Plastic sheeting: We hang plastic barriers between the kitchen and adjacent spaces, creating a sealed construction zone with a zippered entry
- Air scrubbers: During dusty phases (demolition, drywall sanding), we run air filtration units to capture airborne particles
- Daily cleanup: At the end of each workday, we clean the construction area. You should not come home to yesterday’s dust
- HVAC protection: We cover supply and return vents in the construction zone to prevent dust from entering your ductwork
Eating and Cooking Strategies
Be realistic about cooking during a kitchen renovation. Here are strategies that work:
- Meal prep before demo: Cook and freeze 1-2 weeks of meals before the project starts. A chest freezer in the basement is invaluable.
- Embrace simplicity: Sandwiches, salads, microwave meals, and toaster oven cooking are your daily reality for a few weeks
- BBQ season: If your renovation overlaps with warmer months, your outdoor grill becomes your primary cooking station
- Take-out budget: Build a realistic take-out budget into your renovation planning. Two to three take-out meals per week for 8-10 weeks adds up
- Use the slow cooker: A slow cooker plugged into your temporary kitchen can produce surprisingly good meals with minimal equipment
Managing Stress
The emotional arc of a kitchen renovation follows a predictable pattern:
- Excitement (signing the contract, choosing materials)
- Shock (demolition day — “What have we done?”)
- Frustration (week 3-4, when it feels like nothing is happening)
- Hope (cabinets go in, the shape of the kitchen emerges)
- Impatience (countertop lead time, waiting for final details)
- Joy (the reveal — using your new kitchen for the first time)
Knowing this pattern helps. The frustration phase passes. The result is worth it.
Communication Is Key
At JVR Complete, I provide regular progress updates throughout the project. You will know what is happening today, what is planned for this week, and whether the timeline is on track. If there is a delay — and occasionally there are, despite the best planning — you will hear about it immediately, along with the plan to address it.
The worst thing a contractor can do is go silent during a renovation. We do not do that.
If you are planning a kitchen renovation in the Niagara Region and want to work with a team that makes the process as smooth as possible, contact JVR Complete for a consultation.