The curbless shower is one of the most requested features in modern bathroom design. Its appeal is undeniable: a seamless transition from bathroom floor to shower floor creates a sense of openness and luxury that a traditional shower with a curb simply cannot match.
But behind that seamless appearance lies engineering complexity that separates professional installations from disasters. Here is what goes into building a curbless shower correctly.
The Engineering Challenge
A traditional shower works like a bathtub — the curb contains water within a defined area, and the drain handles whatever falls inside that perimeter. Simple.
A curbless shower has no containment. Water must be directed to the drain entirely through floor slope — and that slope must work across the entire shower area while maintaining a level or near-level transition at the entrance. This requires precision that most homeowners (and some contractors) underestimate.
Floor Slope Requirements
The shower floor must slope toward the drain at a minimum gradient of 2% (approximately 6mm per 300mm). This slope must be consistent across the entire shower floor, with no low points where water can pool.
For a curbless shower, the complexity increases: the bathroom floor outside the shower must also slope gently toward the shower area to prevent water from escaping into the bathroom. This means modifying the subfloor structure to create a subtle depression at the shower location — typically achieved with a pre-sloped foam shower pan or a custom-built mortar bed.
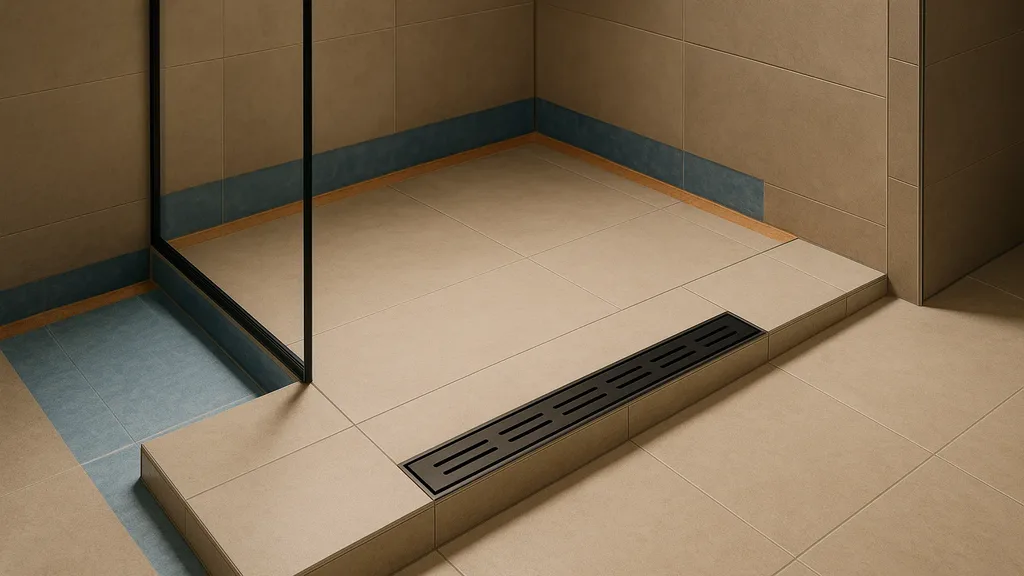
Linear Drain Placement
Most curbless showers use a linear drain rather than a traditional centre drain. Linear drains run along one edge of the shower (typically the back wall) and offer several advantages:
- The floor slopes in only one direction (toward the drain wall), simplifying the slope engineering
- Large-format tile can be used without the complex cuts required to slope toward a centre point
- The visual appearance is sleek and contemporary
- Water capture is more efficient along a wall than at a single point
The drain must be precisely level along its length, set at the lowest point of the shower floor, and connected to the waste line with proper slope for drainage.
Waterproofing: The Invisible Critical System
A curbless shower’s waterproofing system is more extensive than a standard shower because water can reach areas that a curbed shower would protect:
- Full membrane coverage: The waterproofing membrane (Schluter KERDI, Laticrete HydroBan, or equivalent) must cover the entire shower floor, all walls to a minimum height of 1800mm, and extend beyond the shower opening onto the adjacent bathroom floor
- Drain integration: The membrane must bond seamlessly to the drain body with no gaps or channels where water can penetrate
- Corner reinforcement: Inside corners receive additional membrane strips to prevent cracking at joint points
- Curb-free transition: The membrane must wrap continuously from the shower floor to the bathroom floor without any interruption at the entry point
Any failure in this membrane — any pinhole, any unbonded edge, any inadequate overlap — will allow water to penetrate the subfloor. In a curbless shower where water reaches further from the drain than in a curbed shower, the consequences of waterproofing failure are more severe.
Tile Selection for Curbless Showers
Floor Tile
Slip resistance is non-negotiable. The shower floor tile must have a coefficient of friction (COF) above 0.42 (the ADA standard for wet surfaces). This rules out polished porcelain and smooth marble for floor applications.
Recommended options:
- Matte or textured porcelain (many large-format tiles have anti-slip variants)
- Small-format mosaic tile (the additional grout lines provide natural slip resistance)
- Natural stone with a honed or flamed finish
Wall Tile
Walls have no slip requirement, so any tile is appropriate. Large-format porcelain (600x1200mm or larger) on shower walls creates a dramatic, spa-like effect with minimal grout lines.
Glass Panels
While a curbless shower does not require a full glass enclosure, a fixed glass panel (typically 800-1000mm wide) at the shower opening prevents water spray from reaching the bathroom. The panel is frameless, attached to the wall and floor with minimal hardware, and does not impede entry.
This is the best of both worlds: the open, accessible feel of a curbless shower with practical water containment.
Cost Considerations
A curbless shower costs approximately 20-40% more than a comparable curbed shower, primarily due to:
- Subfloor modification for proper sloping
- Linear drain (more expensive than a standard centre drain)
- Extended waterproofing membrane coverage
- Additional labour for precision slope work
For a standard shower area (30-40 square feet), the premium is typically $2,000-$4,000. For the design impact, accessibility benefit, and long-term value it provides, I consider this one of the best investments in a bathroom renovation.
If you are planning a bathroom renovation in the Niagara Region and considering a curbless shower, contact JVR Complete for a design consultation. Our luxury tile expertise ensures flawless execution.